Showing posts with label Organization. Show all posts

Wednesday, January 25, 2012

Progress Report

Well, we have made some slow progress on the closet since I last posted about it.  We purchased and hung shelves.... the purchasing part was no problem-o, but the hanging part was a different story... A story of overcoming diversity.  Thanks to drywall screws and a patient husband! 


After hanging the shelves I put some organization essentials atop them, along with some of Andrew's things.  The four magazine holders on the right are from Goodwill.  I paid less than a dollar for each holder, and then spray painted them and stuck labels on the outsides.
 

The "E" bookend was also from Goodwill... $1.99.  It was originally black, but I spray painted it too.  And no, no one in our family has a name that starts with an "E." 


The deer head is something that Andrew worked long and hard on, so I thought it would be a sweet gesture to include it in the space.  And he painted the Tarheel plate, so it only seemed appropriate to include that as well. 


Still to come:
  • Magazine rack (I have it, but have not hung it yet)
  • Curtain, rod, and hook to pull the curtain back on
  • Chair (The one in the pictures actually goes at our dining room table.)
  • Trash can
  • Clock
  • Lights
  • Yellow and white photo boxes (Four boxes total)
  • Pen and pencil holders
  • BOOKS and LAPTOP!!!

Friday, January 20, 2012

Thoughtful Organization

I am taking away a few pieces of inspiration from this photo, and thought I would share them so you can have a piece or two also:

bhg

I really like the baskets.  Along with the matching white binders, they help give the space a cohesiveness and take the eye clutter down a notch.  I also love the magazine rack on the wall.  I saw a similar one at Marshall's yesterday, but had to sleep on it before deciding if it is worth the $12.99.

The reason I am torn is because I prefer hiding my clutter, my papers, and my projects in folders, baskets, etc... anything to keep them out of sight.  Andrew is not that way at all.  He is all about convenience and ease.  If he is going to put anything back where it belongs at all, that spot has to be easily accessible and visible.  Otherwise, the project will either be forgotten about, or he will never put the thing back where it belongs; he will leave it on the floor, on the desktop, somewhere effortless.  And the office space is technically for Andrew and not for me.  So I am thinking the magazine rack is the way to go... It is still better than having stuff piled on the floor, the desk, or the kitchen table. 

The chair is also right up my alley; however, I am leaning toward a thrifted chair topped off with a pretty cushion.

The goal this weekend is to purchase 2x4s and brackets, have them cut to the proper measurements, and then paint them.  I am leaning toward painting them white as opposed to staining them the harsh color of the desk.  While I am at Lowes, I also plan on purchasing some LED lights to hang in the office space, since there is no overhead light in that [former] closet.

Another view

Thursday, January 19, 2012

Along the Same Lines

Since I am kind of on this "getting organized" kick, I thought I would share this ORGANIZED PANTRY with you, from Courtney at A Thoughtful Place

Here is what her kitchen looks like:

 And here is her pantry:

Let me interject here by saying that the size of this pantry is very comparable to the size of our pantry.  And Courtney has two small children, so Andrew and I have NO excuse for not being able to maintain an organized pantry, in spite of its size. 


Here is a list of things she added to help her get organized:

  • hanging wire shelving system from Target {$35}
  • wrapping paper to line the back of my pantry {$1} Target
  • plastic drawer from Target {$8}
  • chalkboard labels . . . DIY here.
  • two plastic bins from Target to use as makeshift pull out shelves
  • ribbon trim {already had}
  • three blue tins from Target $1 section {already had}
  • oxo containers {already had and LOVE} 

And here is a handy list she came up with to clear to pantry clutter:
  • take everything out of your pantry. Toss what you don’t use or need.
  • put things in clear containers so you can see your inventory
  • label so even the hubby knows where things go when unloading groceries
  • keep things in plain sight {like can goods} so you use them
  • place like items together
  • meal plan to cut down on the random buys that end up filling your pantry
The reason I like her pantry overhaul so much is because it is totally do-able.  She did not go out and spend an arm and a leg.  In fact, she said that the whole job cost about $45, which is pretty darn good.  

Here are some other inspirational, organized pantry ideas, to help get your organizational juices flowing!

From here


This one is a little over the top for my taste.
This one is one of my favorites!
I really like the calendar, grocery list, and meal planner hanging on the door... very cute and clever. (:


Wednesday, January 18, 2012

Piece of Progress

I did not take a picture of the closet before I painted it.  In these pictures, it is painted a light blue/turquoise color... thanks to my hours of labor on Sunday afternoon!  But before 5:00 Sunday evening, it was an off-white/brownish color...

So picture that.

And then picture me painting for a few hours, in order to produce this result:


We had a desk picked out, and we even bought it, but we had to wait a few days to put it together because, I hate to admit this.... Hold on to your britches.... We had to PAY SOMEONE to put the desk together.  How lame are we?!  It was one of those that comes in a box with all the pieces, a big bundle of screws, and horrible instructions. 

Andrew is a wonderful husband, and often does things for me that he would NEVER choose to do on his own.  But even he drew the line at putting this desk together.  Thanks a lot, Wal Mart.  I knew I should have waited until the end of the month when I could hit up the flea market. 

Lesson learned.


The next steps are as follows:
  • More shelves for the back wall
  • Accessories for the shelves (bookends, matching binders, magazine holders, boxes, bins, etc.)
  • Decoupage pen and pencil holders
  • Desk calander
  • Curtain rod/shower rod
  • Curtain 
  • Lamp?
  • Chair 
So, a little bit of progress was made.... And lots of still to come!  (:  

Monday, January 16, 2012

Cloffice

Yesterday I painted the closet in our spare bedroom, with the longer term goal of turning it into an closet office.  I did it almost without help... Andrew had to help me take the sliding doors off the closet. 

Here is some of my inspiration moving forward: 


I have not decided exactly which ideas to incorporate and which to do without, but at least I have a little direction!  With Andrew going back to school, we have the perfect motivation/excuse to take on this little project.  Hopefully it will help eliminate the clutter and mess that seem to appear when he walks in the door from work or school, and will give him a quiet place, free to chaos, so that he can focus! 

Images are from:  The Mustard Ceiling, Better Homes and Gardens, and Country Living.

Thursday, January 12, 2012

2012: Stuff I have Made So Far

Last week I posted a few of the organization tricks that we plan on implementing into our home, but left to head to yoga before finishing the post.  So, are the last little bit of my organization attempts thus far:

Thanks to the original ideas, which you can find here and here, I made these two things for the front of our refrigerator.  We seem to have pens strewn about random places in the house, yet when we need them, we cannot find them.  This tin can seems to be doing the trick so far.  We know exactly where our pens are now!
And we are using the clipboard to help us keep a running grocery list.  It is so much easier to keep track of what we need when the pens and the list are so handy!
The original post of the clipboard, which you have probably already seen on Pinterest, suggests making and giving the clipboard as a gift.  I will definitely be doing that this year since our finances will be especially tight in 2012... now that Andrew is going back to school!  (:  The project is ALMOST free.  I had to purchase the clipboard, which was exactly one dollar plus tax.  Already had the magnets, ribbon, button, Mod Podge, and scrapbook paper.

The next project was kind of a combination of this idea and this one.  The two came together to make this:

 And this project was also free!


 All you need is an empty container like this one, scrapbook paper, and ribbon.  Stickers are optional, but I think they add a special touch.  (:
This wreath is obviously not useful for organizing purposes, but I had to come up with something to replace our Christmas wreath.  I used hot glue, buttons, felt, ribbon, a wooden "A," and a plain wreath.  The wreath cost $4 at JoAnn's, the "A" was $2, and I already had the other materials. 

The wreath needed a friend, so I made a matching "Welcome" sign!

Saturday, January 7, 2012

It's a NEW YEAR!!!

I CANNOT BELIEVE how quickly 2011 passed, nor how much can change in just a year.  God is so neat that way!  Just full of surprises...

Some of the goals we set for our little family are to get more organized (and stay that way!), and to be more frugal.  I am sure both of those have been popular resolutions this New Year.  Since Andrew is going to be returning to school (he starts classes at MTSU this month), it is important for us to save every penny we can.  We do NOT want to have to take out loans for the classes that he needs to take, especially since we are still working on paying off existing school loans.  And being organized is important as well.  He will need a good, quiet place to study and to work on his online classes.  I do not know if it works this way for everyone, but I am much more able to apply myself to getting work done in a serene, clean, and organized environment. 

Here are the strides I have made so far: 

First, we had to figure out a way to organize our Christmas decorations.  One of the worst parts of Christmas is when the season comes to an end and you have to UN-decorate your house!  But doing it in an organized manner made it a little more fun, and I do not feel apprehensive about having a mess to dig through next Christmas when we are ready to decorate again. 

I did not take pictures of the packaging process, but I opted to take things out of their original boxes and bags and package them in large Zip-lock bags.  Doing this created more space and allows me to see clearly what is in each bag. 

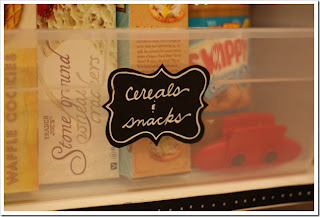
Then, using scrapbooking paper, I created a little folder for the front of each box.  Each folder contains a card with a heading on it indicating what is in each box.  If you pull the card out of its folder, it gives a more specific breakdown of what is in each box.  This way, you do not have to unstack or dig through multiple boxes before finding what you are looking for. 


I used the same idea for Andrew's Army clothing and gear.  I am not sure if we should part with it altogether, but it is definitely going in the attic... if not the trash.

I did the same thing with two long, narrow boxes that I put under the bed.  Both boxes are labeled as "Summer."  One box contains Summer clothing and the other contains Summer shoes. 

Click here to see where I got the idea.  She also has better pictures, as well as pictures of the insides of her boxes.  I love her idea because it is SO functional and helpful, and the pretty paper makes the boxes much more pleasant to look at!  :) 


The next order of business was updating our filing system.  The one we used for 2011 was ineffective at best.  I am not an online bill payer, so we still get LOTS of bills, paper statements, etc., in the mail; thus, we have LOTS of paper to sort through after just a few months into each year. 

I purchased a simple, 19-pocket file folder from Staples (Target had some very pretty ones but they seemed expensive), and dressed it up a little with scrapbooking paper so that we can keep it displayed accessibly on a shelf without it being an eyesore:


It only seemed right that the inside of the folder would match the outside, so I dressed that up with scrapbooking paper as well. 


Here are the labels I used: 
  • Automobile
  • Bank Account
  • Buggie (our dog... shot records, vet receipts, etc.)
  • Comcast
  • Dental/Medical
  • Education/Loans/Bills
  • Financing
  • Health Benefits
  • Insurance
  • Licenses
  • Other bills
  • Prescriptions
  • Personal
  • Receipts
  • Rent/mortgage
  • Taxes
  • Utilities
  • Miscellaneous 


 There are a few more little projects I have done, but it is time for me to get started with the day... will post them soon! 

"May you have the courage to turn your face to the God who meets you in darkness and in daylight."  - Jan L. Richardson

HAPPY (belated) NEW YEAR!!!


Monday, May 2, 2011

Project Priorities

Andrew and I made our first major purchase as a married couple over the weekend.  We purchased a washer and a dryer!  And I must say, it felt AWFUL spending so much money once.  But I CANNOT WAIT to wash everything we own!  I realized today that I have never had my own washer and dryer! 

Here are three very do-able and cute crafts that I would love to incorporate into our new home!

This key rack would be a great addition to any laundry room.  Thank you, Martha Stewart!


Here are the step-by-step instructions you will need for this project.


Here is an adorable wipe off weekly menu board.  Unfortunately, I do not plan out weekly menus (though I probably should), so I would probably just use the board as a place to leave daily notes for Andrew, or reminders for myself.  Step-by-step instructions are provided, but you don't really need them.  All you really need is a 12x12 frame, a 12x12 piece of scrapbook paper, and a dry erase marker!  It doesn't get much easier than that!


I LOVE mason jars!  And this is a great idea.  This project is a little more complicated than the previous two, but the instructions are understandable, and break the project down into manageable pieces.   I think this rack would be perfect for the entry way in our new house!   :) 

Wednesday, April 20, 2011

Out to Dry

The sun is FINALLY shining here, and the weather is gorgeous!  I have been waiting all winter for this!

Andrew and I have purchased our first home.  I have been hesitant to say anything up to this point, just in case something did not work out, but.... so far so good!!!

The home is a blank canvas.  AKA:  It is absolutely perfect for us.  So, I am starting with the obvious... some inspiring laundry room pictures, thanks to Better Homes and Gardens.   I guess living without my own washer and dryer for the past five years has made me REALLY excited to have a laundry room that does not require traveling down four flights of stairs to get to.  My mom said that by the time she and my dad had their own washer and dryer, she was so excited that she wanted to wash everything in their house... and she did, because she finally could!  :) 


Hang in there! We are halfway to the weekend!

Saturday, January 15, 2011

Jarring News!

Ok, the title of this post is ridiculous.  I know.

In a recent post, I promised that I would spend at least a little time this week organizing my craft supplies in jars.  Well, true to my word, I did just that!


The jars do not actually have a home yet, but they are a work in progress. For now, they look quite cozy in their green chair.

While I was on a roll, I decoupaged a few shoe boxes. The small box (which was actually a jewelry box, hence the small size) has crayons in it. One shoe box has fabric in it, and the other has ribbon it in. They, also, are a work in progress.


I will leave you with this cliffhanger:  A new addition has arrived on the crafting scene.  Return tomorrow for its debut!  :)